

Welcome to the ultimate guide for crafting the most delectable, **oven-baked chicken tenders** right in your own kitchen! Forget about greasy takeout; our recipe delivers crispy, juicy, and perfectly seasoned chicken tenders that will quickly become a cherished family favorite. Ideal for busy weeknights, these golden strips of chicken are ready in less than 30 minutes, making them a delicious and convenient alternative to fast-food options. Get ready to elevate your dinner game and delight everyone with a meal that’s both simple to prepare and incredibly satisfying.

When searching for reliable **kid-friendly dinner recipes**, chicken tenders often top the list. But not all tenders are created equal. This particular recipe for **baked chicken tenders** stands out as a true family favorite, not just for its ease and speed, but for its unbeatable taste and texture. Our secret lies in a unique two-step coating process: we first dip the chicken in a flavorful yogurt mixture before generously coating it with seasoned Panko breadcrumbs. This innovative method ensures the tenders remain incredibly juicy and tender on the inside, while achieving an irresistible crunch on the outside. The result is a healthy, wholesome, and utterly delicious meal, perfect for any dipping station you can imagine!
Why You’ll Absolutely Love This Baked Chicken Tenders Recipe
There are countless reasons why these **oven-baked chicken tenders** will become a staple in your meal rotation. Beyond their fantastic flavor, they offer unmatched convenience and wholesome goodness that homemade meals deliver.
- Unbelievably Juicy and Tender: Our special yogurt-based marinade works wonders! It locks in moisture, ensuring that every bite of chicken is succulent and tender, a stark contrast to dry, overcooked alternatives. The yogurt also adds a subtle tang that enhances the chicken’s natural flavor without overpowering it.
- Lightning-Fast Dinner Solution: From start to finish, dinner can be on the table in under 30 minutes! This recipe is a lifesaver for those hectic weeknights when time is of the essence but you still want to serve a delicious and homemade meal. Quick prep, quick bake – perfect for busy families.
- Truly Kid-Friendly & Mom-Approved: Unlike many processed “kid-friendly” options loaded with artificial ingredients or excessive sugar, these tenders are crafted with real, wholesome ingredients. They’re a fantastic way to get protein into picky eaters, offering a meal that’s both appealing to children and meets mom’s approval for nutrition and quality.
- Healthier Alternative: By baking instead of frying, we significantly reduce the amount of oil, making these chicken tenders a lighter, healthier option without sacrificing any of the satisfying crunch. Enjoy your favorite comfort food guilt-free!
- Customizable Flavor Profile: The basic recipe provides a fantastic foundation, but it’s incredibly versatile. You can easily adjust the seasonings in the Panko breadcrumbs to match your family’s preferences – think a touch of paprika for smoky notes, Italian herbs for a Mediterranean twist, or a pinch of cayenne for a subtle kick.
- Easy Cleanup: Baking on a parchment-lined sheet pan means minimal mess. Enjoy your meal without the dread of a mountain of dishes afterward!
Essential Ingredients for Perfect Chicken Tenders
Gathering your ingredients is the first step towards culinary success. This recipe calls for simple, accessible items you likely already have in your pantry or can easily find at any grocery store.
- For the Chicken: You’ll need 1 to 1.5 pounds of high-quality **chicken tenderloins**. These cuts are naturally tender and perfectly sized for this recipe, ensuring even cooking and consistent results.
- For the Irresistible Coating:
- **Panko Breadcrumbs:** The secret to that extra crispy exterior! Panko breadcrumbs are lighter and flakier than traditional breadcrumbs, providing superior crunch.
- **Egg:** Acts as a binder, helping the yogurt mixture adhere to the chicken.
- **Plain Yogurt:** The star ingredient that keeps the chicken incredibly juicy and adds a slight tang. Greek yogurt also works well for a thicker coating.
- **Dijon Mustard:** Adds a depth of flavor and a subtle tanginess that complements the chicken and yogurt beautifully.
- **Garlic Powder:** A classic seasoning that provides aromatic flavor without the raw bite of fresh garlic.
- **Salt and Pepper:** Essential for seasoning the chicken and bringing all the flavors together. Adjust to your taste preferences.
Step-by-Step Guide: How to Make Crispy Oven-Baked Chicken Tenders
Creating these sensational chicken tenders is surprisingly straightforward. Follow these simple steps for perfectly cooked, golden-brown results every time.

- Prepare Your Baking Station: Begin by preheating your oven to a robust 425˚F (220˚C). This high temperature is key to achieving that desirable crispiness. Line a large baking sheet with parchment paper or aluminum foil for easy cleanup, then place a wire rack directly over it. Lightly spray the wire rack with cooking oil to prevent sticking. This setup is crucial for air circulation, ensuring all sides of the tenders get crispy.
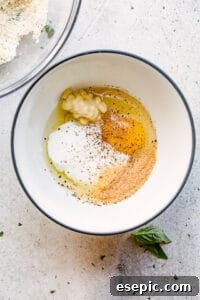
- Set Up Your Breading Station: Create two separate bowls for your coating process. In one shallow bowl, add the **Panko breadcrumbs**. In a second, slightly larger bowl, whisk together the lightly beaten egg, plain yogurt, Dijon mustard, garlic powder, salt, and freshly ground black pepper until thoroughly combined. This forms your flavorful, moist base.
- Coat the Chicken Tenders: Working with one chicken tenderloin at a time, first submerge it completely into the yogurt-egg mixture, ensuring it’s fully coated. Let any excess drip off. Next, transfer the coated tender to the bowl of Panko breadcrumbs. Generously sprinkle the breadcrumbs over the chicken, then gently press them down with your fingers to ensure they adhere firmly to all surfaces. This pressing action helps create a thick, crunchy crust.
- Repeat and Arrange: Carefully transfer each breaded chicken tender to the prepared wire rack on the baking sheet, making sure to leave a little space between each piece for optimal air circulation. This prevents steaming and encourages even crisping. Repeat the breading process with all remaining chicken pieces until they are all beautifully coated and arranged on the rack.
- Bake to Perfection: Before baking, give the coated tenders a final light spray with cooking oil. This helps achieve an extra golden-brown color and irresistible crispness. Place the baking sheet into your preheated oven and bake for approximately 15 minutes. Cooking time may vary slightly depending on the thickness of your tenders. To ensure they are perfectly cooked and safe to eat, use an instant-read thermometer to check the internal temperature; the chicken is done when it registers 165˚F (74˚C) at its thickest part.
- Serve Hot and Enjoy: Once cooked, remove the tenders from the oven. Allow them to rest for a minute or two before serving immediately with your favorite dipping sauces. Get ready for rave reviews!
Expert Recipe Tips for the Best Baked Chicken Tenders
Achieve consistently perfect results with these invaluable tips and tricks:
- Consider Pan-Frying for Extra Crispness: While this recipe focuses on baking, if you crave an even richer, crispier exterior, pan-frying is an option. Heat about half a cup of vegetable oil in a deep-sided skillet over medium-high heat. Fry the breaded tenders in batches, making sure not to overcrowd the pan, for 3-4 minutes per side, or until golden brown and cooked through. Always check the internal temperature.
- Remove the Tough White Tendon: For an exceptionally tender bite, consider removing the tough white tendon visible in each chicken tenderloin. While not strictly necessary, it makes the chicken easier to chew and more pleasant to eat, especially for children. A pair of kitchen scissors or a small sharp knife can easily do the job; simply grip the tendon with a paper towel and pull the chicken away.
- Always Use a Wire Rack: This is a non-negotiable step for crispy baked tenders! Baking directly on a sheet pan will cause the underside of the chicken to sit in its own juices, resulting in a soggy bottom. The wire rack allows hot air to circulate all around the chicken, ensuring a uniformly crispy crust.
- Cook to the Correct Internal Temperature: Food safety is paramount. Always use an instant-read thermometer to verify that your chicken tenders have reached an internal temperature of 165˚F (74˚C). Insert the thermometer into the thickest part of the chicken, avoiding the bone.
- Don’t Overcrowd the Pan: Give your chicken tenders plenty of space on the baking rack. Overcrowding leads to steaming, which prevents the tenders from crisping up properly. If necessary, use two baking sheets.
- Pre-Season the Chicken: For an extra layer of flavor, lightly season the raw chicken tenderloins with a pinch of salt and pepper before dipping them into the wet batter.
- Make Ahead and Freeze: These tenders are fantastic for meal prep! You can bread the chicken and freeze it raw on a baking sheet before transferring to a freezer bag. When ready to cook, bake from frozen, adding about 5-10 minutes to the cooking time.

Delicious Accompaniments: What to Serve With Baked Chicken Tenders
Baked chicken tenders are incredibly versatile and pair well with a wide variety of sides. Create a balanced and satisfying meal by choosing accompaniments that complement their crispy texture and savory flavor. We particularly love serving these tenders with my creamy homemade honey mustard sauce and a side of crispy garlic fries.
Hearty Side Dishes:
- Golden French Fries or Sweet Potato Fries: A classic pairing! Whether baked or air-fried, hot and crispy fries are a perfect match.
- Creamy Mashed Potatoes: For a comforting and filling meal, mashed potatoes provide a smooth contrast to the crispy chicken.
- Fluffy Rice: Simple white rice, brown rice, or even a flavorful Instant Pot Mexican rice can be an excellent base.
- Macaroni and Cheese: The ultimate kid-favorite comfort food, mac and cheese makes for a truly satisfying combination.
Fresh and Green Sides:
- Steamed or Roasted Vegetables: Broccoli, green beans, or carrots offer a healthy and colorful addition.
- Crisp Side Salad: A simple garden salad with a light vinaigrette provides a refreshing contrast.
- Parmesan Asparagus Fries: A gourmet twist on classic veggie fries, offering both flavor and a healthy crunch.
- Corn on the Cob: Sweet and juicy, corn is a family-friendly vegetable that always pleases.
Unique and Flavorful Additions:
- Coleslaw: The creamy, tangy crunch of coleslaw cuts through the richness of the chicken beautifully.
- Baked Beans: A sweet and savory side that adds a touch of barbecue flair to your meal.
- Cornbread: A delightful Southern-inspired accompaniment that is both comforting and flavorful.
The Ultimate Dipping Sauce Extravaganza
What are chicken tenders without a fantastic dipping sauce? This is where the fun truly begins! Setting up a “dipping station” with an array of sauces is a surefire way to make mealtime an exciting experience for everyone. Offer one or several of these delicious options to cater to all tastes – the possibilities are truly endless!
- Classic Ketchup: The timeless favorite, especially beloved by kids for its familiar sweet and tangy taste. You can’t go wrong with this staple.
- Honey Mustard: A perfect balance of sweet and tangy, our creamy honey mustard sauce is an absolute flavor favorite that pairs impeccably with crispy chicken.
- Smoky BBQ Sauce: Rich, smoky, and often a little sweet, BBQ sauce offers a robust flavor profile that’s perfect for a hearty and satisfying dip.
- Creamy Ranch Dressing: A crowd-pleaser with its creamy texture and herbaceous notes, ranch dressing is a versatile choice that complements almost anything.
- Sweet and Savory Teriyaki Sauce: For an Asian-inspired twist, teriyaki sauce brings a wonderful blend of soy, ginger, and sweetness to your tenders.
- Tangy Blue Cheese Dressing: Robust and piquant, blue cheese dressing is an excellent choice for those who enjoy a bolder flavor, especially good with a hint of spice.
- Spicy Sriracha or Hot Sauce: For heat seekers, a dollop of Sriracha or your favorite hot sauce provides an invigorating kick that wakes up the palate.
- Herby Marinara Sauce: A delicious, unexpected twist! This tomato-based, herb-infused sauce offers a flavor reminiscent of chicken parmesan, perfect for a savory dip.
- Garlic Aioli: A rich, garlicky mayonnaise-based sauce that adds a touch of sophistication and incredible flavor.
- Sweet Chili Sauce: Offers a delightful balance of sweet heat, perfect for an exotic flavor adventure.

Storing Leftovers and Reheating for Best Results
These **oven-baked chicken tenders** are so delicious, you might not have many leftovers! But if you do, they store beautifully and reheat well, making them perfect for lunch the next day or a quick snack.
- Refrigerator Storage: Allow any leftover chicken tenders to cool completely to room temperature (within two hours of cooking). Transfer them to an airtight container and store them in the refrigerator for up to 3 to 4 days.
- Freezer Storage: For longer storage, cooked chicken tenders can be frozen. Once completely cooled, arrange them in a single layer on a baking sheet and freeze for about an hour until solid. This prevents them from sticking together. Then, transfer the frozen tenders to a freezer-safe bag or airtight container, removing as much air as possible. They will keep in the freezer for up to 2 months. Thaw frozen tenders in the refrigerator overnight before reheating.
- Reheating for Crispness: To bring back that glorious crispness, the oven is your best friend. Preheat your oven to 350˚F (175˚C). Place the tenders on a wire rack set over a baking sheet (just like when you first baked them) and reheat for about 10-15 minutes, or until they are thoroughly heated through and crisp again. For an even quicker method, an air fryer at 375°F (190°C) for 5-7 minutes also works wonderfully. Avoid microwaving, as it tends to make them soggy.
More Irresistible Chicken Recipes to Explore
If you loved these **oven-baked chicken tenders**, you’re in for a treat! Our collection of chicken recipes is designed for deliciousness and ease, perfect for any night of the week. Expand your culinary repertoire with these other fantastic options:
- Spicy & Sweet Bang Bang Chicken
- Crispy Homemade Popcorn Chicken
- Ultimate Copycat KFC Chicken Sandwich
- Zesty Lemon Chicken Breasts

★
★
★
★
Oven Baked Chicken Tenders
Ingredients
- 1½ cups Panko breadcrumbs
- 1 large egg, lightly beaten
- ¼ cup plain yogurt
- ½ tablespoon dijon mustard
- ½ teaspoon garlic powder
- ½ teaspoon salt, or to taste
- ¼ teaspoon freshly ground black pepper
- 1 pound chicken tenderloins
- oil spray
Instructions
-
Preheat the oven to 425˚F.
-
Line a sheet pan with foil or parchment paper, set an oven-safe cooling rack over the baking sheet, and spray it with cooking oil. Set aside.
-
Place panko crumbs in a bowl.
-
In a separate bowl, combine lightly beaten egg, yogurt, dijon mustard, garlic powder, salt, and pepper; whisk with a fork until thoroughly combined.
-
Add chicken tenders (working with one chicken tender at a time) into the egg batter and toss to coat.
-
Pick up chicken and place it into the panko bowl. Dredge the chicken tenders with breadcrumbs, then press down to adhere.
-
Transfer the tenders to the wire rack on the baking sheet, leaving some space between each piece. Repeat the process to coat all chicken tenders.
-
Spray the chicken tenders with oil spray.
-
Bake for 15 minutes; check for doneness with an instant-read thermometer – chicken is baked when the thermometer registers at 165˚F.
-
Remove from oven and serve.
Equipment
-
Measuring Cups and Spoons
-
Mixing Bowls
-
Large Baking Sheet
-
Cooling Wire Rack
Notes
- If you prefer frying the chicken tenders, pour half a cup of vegetable oil into a pan and cook the chicken tenders on both sides until cooked through. DO NOT crowd the pan and fry them in batches.
- For an easier, tender chew, use kitchen scissors to remove the rigid white tendon located at the top of the chicken tenders.
- Use a wire rack – it keeps the bottom of the chicken crisp and prevents sogginess.
- Use an instant-read thermometer to check if the tenders are cooked to an internal temperature of 165˚F.
Nutrition
Nutritional info is an estimate and provided as courtesy. Values may vary according to the ingredients and tools used. Please use your preferred nutritional calculator for more detailed info.
Did you make a recipe? Leave a rating